
Manage Menu Items
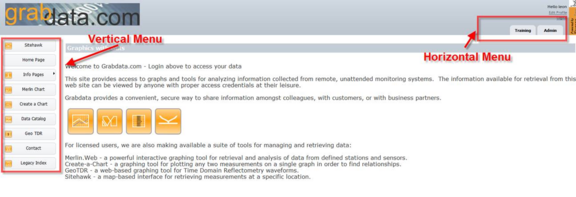
The Manage Menu Items interface allows an Administrator to add new menu options to the Web Interface. Once a Menu Item is created, it is added to an existing vertical or horizontal menu using the Web Personalization interface.
When the Manage Menu Items interface is opened, a list of existing Menu Items is displayed. Existing Menu Items may be edited by clicking on the pencil icon in the Menu Item row.
Menu Items generally represent shortcuts to specific pages on Merlin Web. N However, sub-menus can be created by associating Menu Items with a Parent ID.
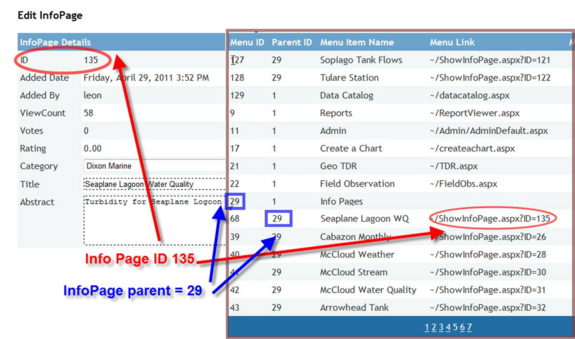
In the figure above, a sub-menu of Info Pages is created by associating Info Page menu items with a Parent ID of 29. When a user mouses over the Info Page button (Menu ID 29), a list of all Info Pages assigned to Parent ID 29 will appear.
Editing or Adding a Menu Item brings up the following interface:
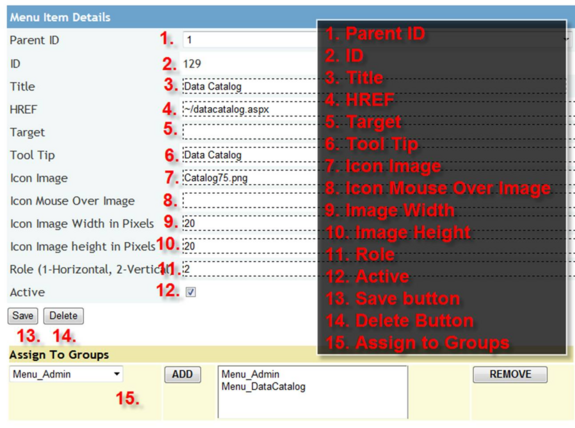
1. Parent ID: This drop-down box determines whether the Menu Item will appear as a stand-alone item (Parent ID 1) or as a sub-menu to another Menu Item.
2. ID: This unique identifier value is automatically generated by Merlin Web.
3. Title: This field determines the text that will appear on the Menu item.
4. HREF: This field contains the destination a user will navigate to when selecting the menu item. To create a link to an Info Page, the path should read ~/ShowInfoPage.aspx?ID=xxx, where xxx is the Info Page ID.
5. Target: This field is not currently used by Merlin Enterprise.
6. Tool Tip: This field determines the pop-up information text that appears when a user mouses over the menu item.
7. Icon Image: This field can be used to define a graphic that will appear on the Menu Item button. Image files can be uploaded using the interface at the bottom of the screen. Image Files are saved to the root directory of Merlin Web and are referenced by the simple filename- i.e. “Buttonicon.png”, rather than “~/Buttonicon.png”.
8. Icon Mouse Over Image: This field defines a second image that appears when a user mouses over a menu item.
9. Icon Image Width: This field determines the size of the icon in the Menu Item.
10. Icon Image Height: This field determines the size of the icon in the Menu Item.
11. Role: This field determines whether the menu item should appear on the Vertical or Horizontal menu.
12. Active: This checkbox determines whether the menu item is active or inactive. Inactive menu items do not appear in the menus.
13. Save button: This button saves changes made to an existing menu item or inserts a new menu item.
14. Delete button: This button removes a menu item. Deleted menu items cannot be recovered.
15. Assign to Groups: This interface allows an Administrator to add a menu item directly to a group that has been pre-defined using the Credential Manager. The left side of the screen displays all groups that use Menu Items, and the center list panel displays all groups the info page is currently assigned to.