
Manage InfoPages
InfoPages are web pages that can be made available to different user roles using the Manage Users Interface. Typical web pages may include all the charts for a given station, flood emergency plan information, or directions to an office. The InfoPage manager contains a powerful HTML editor that allows a user to create InfoPages for any subject.
The Manage InfoPages link opens a list of all created InfoPages. These InfoPages can be sorted by category, edited, or deleted. Below the list, a user can navigate forward or back through multiple pages of existing InfoPages. Beside each Info Page are two icons. The pencil icon leads to an edit screen, and the trash can icon will delete the selected Info Page.
On the main page, a link titled “Add New InfoPage” brings up the following interface:
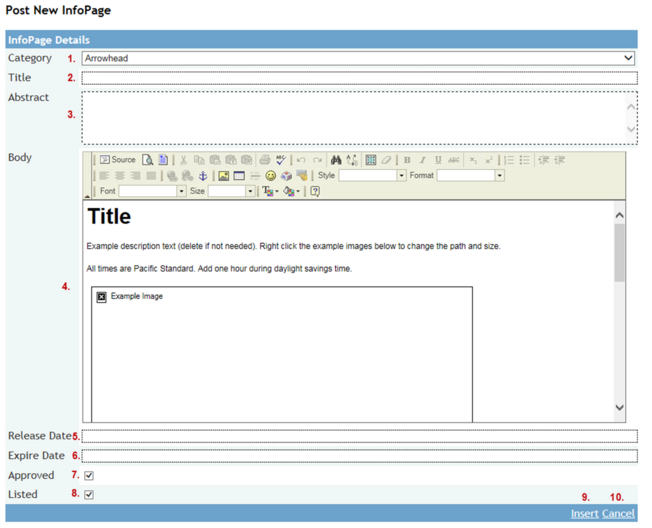
The Add Info Page interface contains the following controls:
1. Category: This drop-down box contains a list of the Info Page Categories created in the Admin Interface.
2. Title: This field contains the short text title of the info page
3. Abstract: This field contains a longer description of the info page.
4. Body: This WYSIWYG HTML editor is used to create the body of an Info Page. A template is shown that has an empty image as well as an editable title and description at the top. Change or delete the title and description of your infopage. To insert an image, right click the example image and click on Image Properties:

Enter in the URL, width, height, etc. of the image desired. If auto-chart is creating jpegs of charts that you want to display on an info page, specify the path to the directory that the jpegs are getting stored into.
5. Release Date: The initial date the Info Page will be available.
6. Expire Date: The date the Info Page becomes unavailable.
Using the Release and Expire Date fields, Info Pages can be created for seasonal topics, such as flood or snowpack information.
7. Approved: An unapproved Info Page will be displayed with a disclaimer informing viewers that the InfoPage has not been reviewed and approved.
8. Listed: This field functions like the “Active” button. Unlisted InfoPages will not appear in InfoPage listings.
9. Insert: This button will save the newly created info page.
10. Cancel: This button will discard any edits made to the Info Page and exit the form.
When Editing Info Pages, an additional control will appear under the main form. This control allows an Administrator to add an Info Page to a group previously created in the Credential Manager. Assigning Info Pages to groups allows an Administrator to regulate access to an Info Page based upon user roles.
When Adding Info Pages, a new Menu Item will automatically be created to access the page that has just been added. When a Menu Item is created for an infopage, the Parent ID is assigned to the Menu ID of the “Infopages” Menu Item (in the case below, the Infopages Menu ID is 41). The HREF field is set to “~/ShowInfoPage.aspx?ID= X”. The X value is the Infopage ID. This ID can be found back under the Admin->Manage Info Pages when clicking on the Edit ( ) button of a specific Infopage. See more info at Manage Menu Item section of the manual.
) button of a specific Infopage. See more info at Manage Menu Item section of the manual.
After saving the new menu item it will create a role that contains a menu item for the infopage, as well as the infopage itself. The role will be called “InfoPages_x” where x is the title of the infopage. Assign this role to users through the Manage Users Interface.