
Manage Users
The Manage Users interface allows an Administrator to create or edit user information.
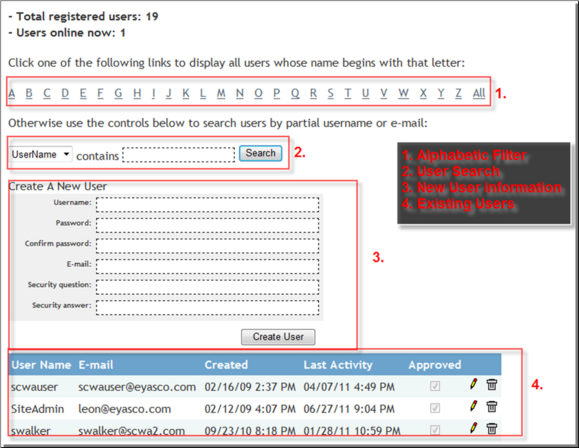
The Manage Users screen consists of the following components:
1. Alphabetic Filter: This control allows an administrator to filter all users by the first letter of their username. Users are displayed at the bottom of the interface in section #4.
2. User Search: This control allows an administrator to search for a specific user.
3. New User Information: These fields allow an Administrator to create a new user.
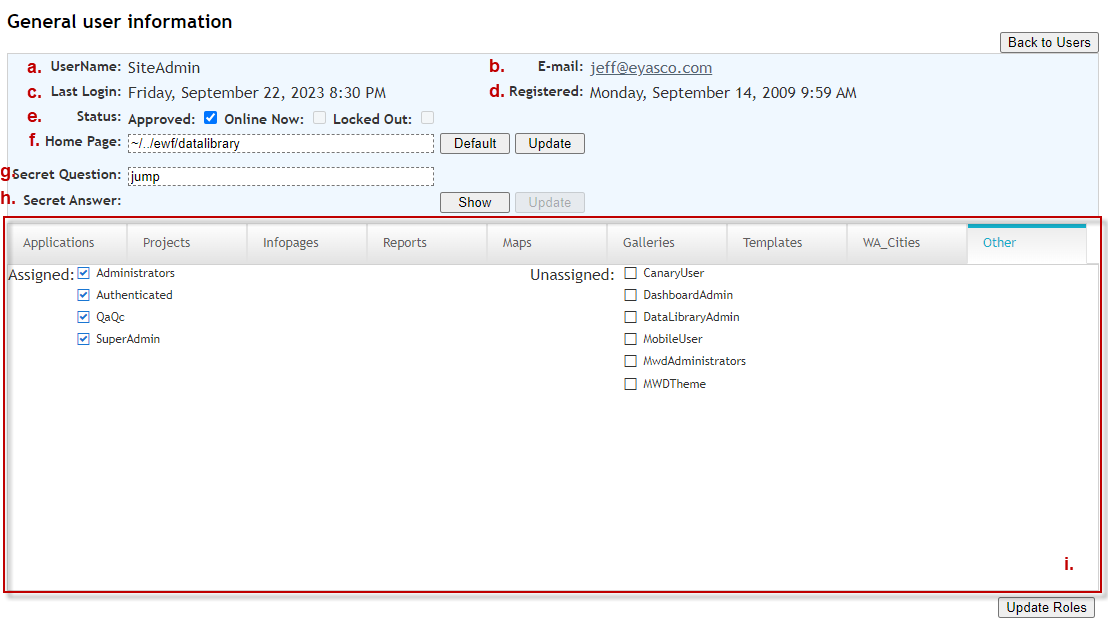
4. Existing Users: Users found through the Alphabetic Filter or the Search controls are displayed here. To delete a user, click on the trash can beside the user name. To edit an existing user, click on the pencil icon beside that user name. The following interface will appear:
-
User Name: The name of the user being edited.
-
Email: The email of the user being edited.
-
Last Login: The date and time the user last logged into Merlin Enterprise or Merlin Web.
-
Registered: The date the user was created.
-
Status:
-
Approved: This checkbox indicates the current state of the user. If a user creates a new account using the controls on the login page, the account must be approved by an administrator before being activated.
-
Online Now: This checkbox indicates if a user is currently logged into Merlin.
-
Locked Out: A user will be locked out after 5 invalid login attempts, or can be locked out by an Administrator using this form. A locked out user will be unable to log into Merlin. Once a user is locked out, an administrator must use this interface to unlock the user.
-
Home Page: The initial page a user sees after logging in. If no homepage is defined for a user, that user will be sent to the default web page (usually Sitehawk).
-
Secret Question: The secret question is set by user and used for reset the password.
-
Secret Answer: The secret question is set by user and used for reset the password.
-
User Roles: This section displays all Roles that a user can be assigned to. The roles each lie under a specific category of Applications, Projects, Infopages, Reports, Maps, or Other. Click the checkbox to select a Role to a user, and select the ‘Update’ button to assign the roles to the user. See below for more details on how the categories are defined.
Each category (Applications, Projects, etc.) contains a specific structure of groups and group items. The structure is as follows:
- Applications: Contains a menu item only
- Projects: Contains a project item only
- InfoPages: Contains a menu item and an infopage item
- Reports: Contains a report item only
- Maps: Contains a map item only
- Galleries: Contains a gallery item only
- Templates: Contains a template item only
- Other: Contains any items and doesn’t fall in one of the above categories