
Manage Sitehawk
The Admin Interface is used to create new maps for the SiteHawk application. New maps are created by selecting the stations that a user wishes to view together. The map boundaries and size are automatically generated, but can be manually adjusted by the end user. Multiple maps may be created. For example, each project might have a map that displays only the stations included in that project, and an overview map might contain all project and stations.
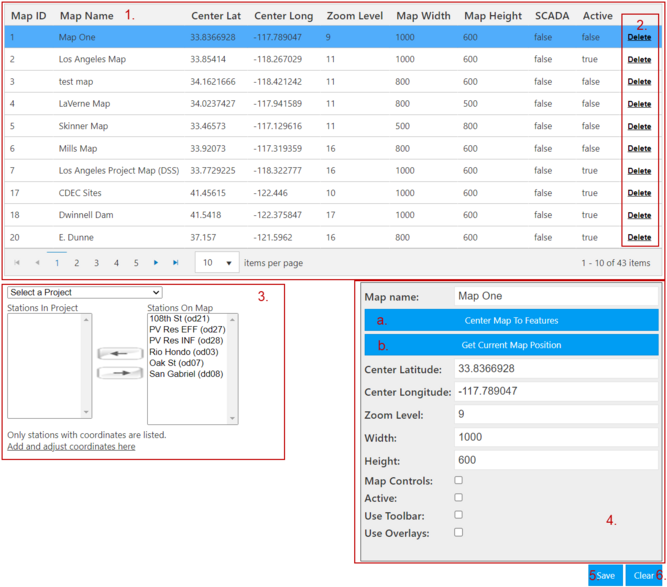
The Manage Sitehawk interface contains the following controls:
1. Map Definitions: This table contains the parameters for all created maps. Existing maps can be edited by clicking the pencil icon. The parameters are then displayed in the Map Details section.
2. Delete: This button removes a map from the database. Deleted maps cannot be recovered.
3. Station Assignment: This section is used to assign stations to a map definition. The right-hand “Assigned Stations” list determines which stations will appear on the map. Stations can be added or removed from the list by using the buttons located between the two lists. Only stations with defined latitudes/longitudes will appear in the list. (Note: these latitudes and longitudes can be added and edited in the Data Library. See Data Library - Metadata section)
4. Map Details: This section of the interface is used to change map definition parameters.
a. Dynamic Coords: This button will dynamically retrieve minimum/maximum latitudes and longitudes for the map based on where there the selected stations are.
b. Current Position: This button will fill out the minimum/maximum latitudes and longitudes of where the map currently is positioned.
5. Save: This button saves any changes to a map definition. When creating a new map, this button becomes an Insert button.
6. Clear: This button clears all the fields in the Map Details section, allowing a new map to be created.